Label automatically with models
V7's Models feature opens up the ability to use a trained model to automatically label your data. In this guide, we'll take a look at how you can structure your workflow to take the manual work out of labelling.
Getting started
The crucial ingredient to our workflow here will be our model. If you haven't trained a model in V7 yet, follow the steps here to get one running.
If you've already created a model, head to Models, click Start, and select the minimum and maximum number of servers to use when running your model. This will determine the speed with which your model is able to label items.
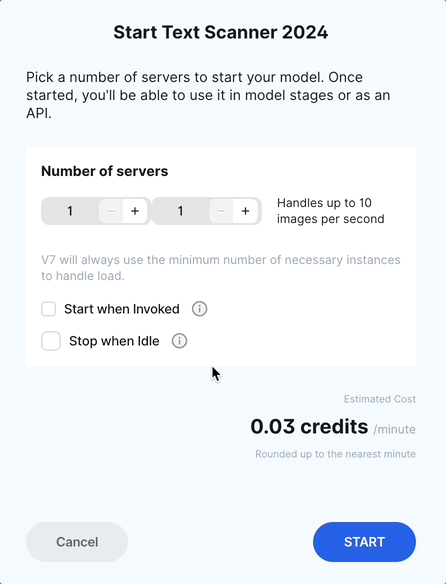
You can also choose to Start when invoked - this will automatically turn you model on as soon as an inference request is made. In other words, as soon as a file is sent through the model stage in your workflow, the model will turn on automatically.
Set up your workflow
Now that your model is ready to use, head to the Workflows page and hit Create Workflow to open up the Workflow creation wizard.
You can also access the workflow creation wizard in the final stage of creating any new dataset.
Add a Model stage, click Connect Model, and map the classes the model was trained on with the corresponding classes that the model will output.

Label
When Auto-Start is enabled, annotators can trigger the model by simply sending items to the next stage when a model stage follows an Annotate or Review stage.

Workforce Managers, Users, and Admins can also send files to the Model stage in bulk by filtering for all items in the stage prior, selecting all and updating their stage.

Once the Model stage has labelled your data, your reviewers can step in to make any required changes to the model's inference.
Manage your Models
After the model has been started and used within your workflow to label, the model can be managed in different ways.
By default, Stop when idle will be turned on. This will automatically stop the model when it does not receive any requests for more than an hour.
Heads up! If Stop when idle is not selected, the model will continue to run until it is manually turned off from the Models page.
To update or stop a running Model, hover over the Running icon and select Update.
From there you can adjust the number of server instances for the model or stop deployment.
| Status | Meaning |
|---|---|
| Stopped | The model isn't being used |
| Starting | We're spinning up the servers to host the model. This should only take a minute or two. |
| Running | The model is up and running. |
| Stopping | Servers are being spun down as deployment is being stopped. |
| Error | Something went wrong during model training. Contact us. |
Updated 10 months ago